Running Multitrack Audio Support LIVE with SoundTrack Pro

This past weekend I had the privilege of running the FOH position for “Let There Be Light”, the Christmas 2010 program at Crossroads Community Church in Kokomo, IN. This particular production was very complex and advanced for a church this size and at their stage of production development. Here’s a quick overview of the basics:

  • live drumkit in a fishbowl (isolation plexi with absorption lid and back) – 8 mics
  • Bass gtr, two electric gtrs, and two acoustic guitars rounded out the rhythm section (electric guitars were run 30′ offstage for isolation and stage volume reduction)
  • Live grand piano with both a pickup and pzm mic (2 lines), and a synth player
  • 10 piece orchestra (4 tpts, euphonium, 2 saxes, 2 clarinets, and flute)
  • 40 voice live choir
  • 5 lead vox
  • 4 drama/speaking wireless
  • stereo video and CD feeds round out the normal requirements
  • Rhythm section and lead vox were all in-ear buds via Aviom mixers
  • Choir Director and Orchestra Director each had an Aviom mixer that fed floor wedges.

OK. With the background info out of the way, it’s now for the subject of this article – running multitrack audio support using SoundTrack Pro.

Early in the preproduction process, I made the case that anytime you want a choir and full rhythm section simultaneously you’ll be disappointed with the lack of volume and clarity from the choir mics. Even when you go to exremes of all IEMs, drums in a fishbowl, and guitar amps offstage, you will still not be able to get sufficient volume out of a live choir – especially one that is less than 50 persons and is made up of church volunteers (which usually means less than half of them will be really great vocalists who can project properly). This assessment matched what the production team had experienced in previous productions in years past.

I suggested that we pre-track the choir so that we could supplement the sound of the live choir with the pre-recorded voices. Our team at Oakbrook Church had used this technique a few times previously with great success. Crossroads had never attempted anything on this scale before, but were open to the possibilities. After a series of meetings, including a couple with the Choir Director, the decision was made to go for it. The Worship Pastor then spent a couple of weeks getting things ready (making background loops and clicktracks).

We blocked out a Saturday and scheduled each choir section (Soprano, Alto, Tenor, and Bass) in 2 1/2 hour blocks. We then recorded each of the sections on all 8 songs using the Worship Pastor’s MacBook with ProTools and 2 Shure KSM44 microphones. At the end of that recording day we had our pre-tracked choir! We had to do a little post-sweetening (gating, combining different takes, blending, etc.), and then exported the files from ProTools to disc. On a different day, we also recorded some narrator voiceover tracks which would be needed for the production.

Then it was time to set up SoundTrack Pro. A few of my friends questioned this choice as a playback medium, but I was confident that it would work. The choice to use STP was kind of made for us. The Worship Pastor’s computer had ProTools, but PT only works with Avid-approved hardware, and none of us had any PT interface with enough outputs. But I did have a MOTU 896 firewire interface in my aresenal (though I didn’t have any current versions of AudioDesk or Digital Performer to use with it.) We considered GarageBand briefly (which would have played back all the tracks) but it would not output in anything other than stereo. So SoundTrack Pro was chosen mainly because it was the only multitrack audio app we had that would utilize the output capabilities of my MOTU interface.

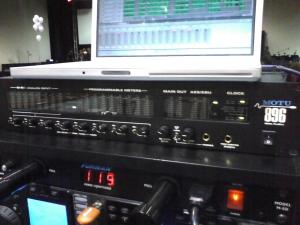
The MOTU 896 interface sitting beneath my MacBook Pro running SoundTrack Pro.

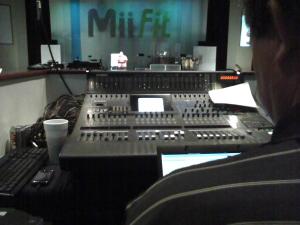
One bonus feature of using my 896 in this application is that the main FOH console is a Yamaha DM2000 – a digital board. So we were able to use the 896’s ADAT optical digital output right into the Yamaha. (We had to run a Wordclock BNC cable from the Yamaha back to the MOTU to make this work right. This made sure the two digital clocks in the two devices were synchronized).

We ended up with a total of 7 tracks (more than could have been accomplished had we used DVD Dolby 5.1 as a playback medium). The tracks were:

  1. Soprano
  2. Alto
  3. Tenor
  4. Bass
  5. Tracks
  6. Click
  7. Narration

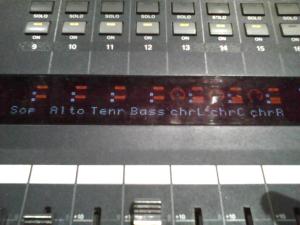
When setting up the channel layout, I ran the pre-recorded tracks alongside the three live choir mics so they were all together. In the picture below, you can see the mixer channels. chrL stands for Choir Left, chrC for Choir Center, etc.

Back to SoundTrack Pro. Because the transitions happened very fast in this program, and because the Narration often happened in between songs, I decided to make the entire program one long song. Here is a screenshot of the SoundTrack Pro window:
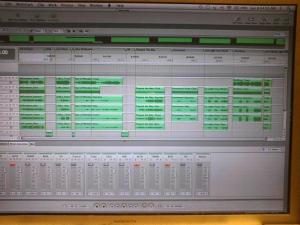
A SoundTrack Pro screenshot. The timeline moves from left to right. The tracks from top to bottom are: Track, Click, Soprano, Alto, Tenor, Bass, Narration.

On the Yamaha console, I combined all choir mics (live and tracked) to one common Subgroup. This way I had an overall level for the entire choir:
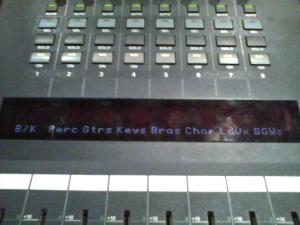
8 Subgroups on the Yamaha DM2000: B/K (bass/kick), Perc (all other drums), Gtrs, Keys, Brass, Choir, Lead Vox, and BGVs

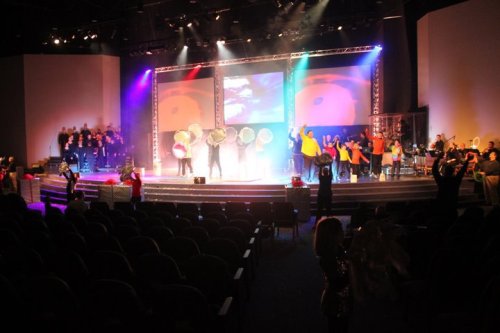
And everything went off without a hitch! My MacBookPro never crashed or froze throughout an entire week of rehearsals and 3 performances. Here’s the “money shot” of the program:
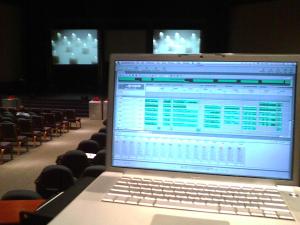
Mixing Two Services at Different SPLs

At one of the churches I’m working with, the tale is all too common. It is a large multigenerational congregation with a lot of history. As such, the attendance trend is for an older crowd to populate the early service, with the later service being dominated by younger families. This is not surprising as the same thing is probably happening all across the country.

One thing that can’t be avoided is the SPL preference of these two unique groups. I use the word preference pretty lightly. It’s stronger than that. The older generation becomes pretty vocal in their displeasure when the volume gets too much for them. Conversely, for some in the second service the volume never gets loud enough. If they don’t feel the Kick busting them in the chest, they’re not happy!

So what does the sound tech do? There isn’t time to rebuild the mix between services. A simple Master Fader change doesn’t work. That makes everything lose its presence, including vocals. Yet we don’t want to get crazy with changing instrument faders or we will upset the Pyramid mixing technique.

So we experimented this week. Here is our test method:

  1. During the first half of rehearsal, we build a normal Pyramid Mix as we normally would. We start with the drums and bass, mixing them at the appropriate level for the acoustic volume of the drums in the space. Then move up the pyramid until we achieve a great mix.
  2. Then for the last half of rehearsal, we reduce the master fader 6 dB.
  3. Then at the subgroups, we pull up the vocals and piano groups 3 dB.
  4. We ask the drummer to “ease up” on the first service.

So we have effectively “halved” (-6 dB) the apparent volume of the entire mix, while compensating the vocals and piano a bit. Now for 2nd service, we only have to adjust 3 or 4 faders ( Groups 5, 7, 8 back down 3 dB – and then Master Fader back up to its original position). Voila – we’re back where we need to be for 2nd service.

Some would suggest that we do the opposite (pull down drums, bass, guitars, keys, etc.) But for our situation, our method is the least amount of fader changes.

Have you done something similar? How did it work?

Using The Various Types of EQ

You can use EQ to do a lot of things. Some are very basic and some are kind of exotic. In this post, we will focus on the most typical uses for the different kinds of EQ in a Pro-Audio / Live Sound environment. Also keep in mind that as we progress into the digital age, these EQs may not be separate pieces of hardware in an equipment rack. They may be options in a menu in a system processor, digital console, effects unit, or computer plugin. But the function and purpose is exactly the same.

BANDPASS

SHELVING

  1. Crossover Filters and System Processor settings
  2. Channel Strip HPF
  3. Driver (speaker) protection
  1. Channel Strip EQ (ie: 3 or 4 band EQ)
  2. Equal Loudness Curve Correction see Fletcher-Munson wiki article
  3. Tone correction on instrument
    amplifiers and preamps

GRAPHIC

PARAMETRIC

  1. Ringing Out Monitors (feedback control)
  2. System Toning see Tuning vs. Toning article by Bob McCarthy
  3. as a Channel Insert for more control
  4. in a compressor’s Sidechain for use as a De-esser
  1. System Tuning (a.k.a the Room EQ)
  2. Channel Strip EQ (on more advanced consoles)
  3. Feedback Control in monitors or as a channel insert

NOTCH FILTER

AUTO BUSTERS

  1. Tight Feedback control for monitors
  2. as a channel insert for precise control on a specific input
  3. as a Group Insert for precise control on a group of inputs (lavalier mics, for example)

  1. an extra level of feedback protection in a fast-paced, high stage turnover environment (such as a festival or open-mic night)
  2. as a channel insert on a specific
    input
  3. as a Group Insert for precise
    control on a group of inputs (lavalier mics, for example)

Caution should be exercised where it concerns auto feedback busters. There are several concerns:

  1. The more inexpensive models (Behringer) and some of the earlier versions of the technology (Sabine) can truly do some horrific things to the sound. Yes, they may actually kill some feedback, but what else does it kill? Your frequency response, good tone, and phase response for starters!
  2. Just because they are so-called “smart” devices, that doesn’t mean they are. Do they know the difference between feedback and certain legitimate musical sounds? NO. In fact, any source that has a pure, steady fundamental pitch without a lot of harmonics is going to get cut by the device.
  3. They can do a lot of things without you being aware of it. Because they auto-sense and auto-engage filters, they can do things when you’re not paying attention. And why would you pay attention? There’s probably a million other things going on at the stage that need your attention!

So because they can be fairly destructive, you should be cautious with them. I know a lot of the Pro Audio world just outright bans them from the premises. Seriously! If you do feel you need one, follow these couple of rules. First, stick to the really good ones. The Shure units and the Peavey Ferrets are particular standouts. Second, use them primarily on speaking mic inputs or groups – they seem to do a really good job there. Try to avoid using them on master monitor sends, and absolutely refuse to use them on the House Mix. That’s just the wrong tool for the job.

An EQ Primer

There are a few different types of equalization. This post is an overview of them. In part two of this topic, I will talk about the specific uses for these types in a Live Audio setting.

TYPES OF EQ

  1. Bandpass. This is the method used in crossovers, High-Pass Filters and Lo-Pass Filters. Full bandwidth material enters the circuit, and at a given frequency, the material is processed separately. In a HPF set to 80 Hz, for example, the material below 80 Hz will be lowered dramatically (typical would be 12 dB per octave), while material above 80 Hz will not be processed at all.
  2. Shelving. This is similar to bandpass, but it is variable and can be adjusted for boosting as well as attenuation. The simplest way to think of shelving EQ is your stereo system’s Bass and Treble knobs.
  3. Graphic. A common EQ type which can be found not only in pro audio, but in car audio, home theater, and computer applications. It could be as simple as 3 filters (what an average Joe might call “sliders”), or it could be as complex as 31 filters. Depending on how many filters there are, the manufacturers use different names for them. An EQ with 15 filters (also called 15-band EQ) is often described as a 2/3 Octave. This is because each individual filter affects 2/3 of an octave of frequencies. A 31-band EQ is also known as a 1/3 Octave. If you are a musician, imagine a filter that is centered on middle C. If you decrease that filter, you would not only affect C, but Bb through D as well.
  4. Parametric. A much more precise tool, a parametric EQ allows you to manually select the exact frequency you wish to change, how wide a bandwidth you want to affect, and the level of change you want to apply. With a parametric, you can select a slice of the frequency spectrum as narrow as 1/10 of an Octave or more.
  5. Notch Filters/Feedback Supressors. Sometimes going as narrow as 1/30th of an Octave or more, these very precise tools are used primarily for eliminating feedback from a system while trying not to damage the frequency response of the overall system. In recent years all the manual models have been discontinued and the feature has been included in system processors. But there are also many “automatic” feedback detection devices which claim to be able to set themselves. Your mileage may vary :-)
  6. Software-only Special EQs. In the world of digital audio and mastering, there are a couple of newer types of EQ – specifically the Paragraphic and Dynamic EQ. Neither of these types really exist as a piece of hardware, but they can be useful tools in the digital realm. *CORRECTION: The BBE Sonic Maximizer appears to be a Dynamic EQ, which applies what is essentially a Fletcher-Munson Curve dynamically (meaning the louder the signal, the more EQ is applied. This is how they disguise the hiss from the boosted high frequency EQ. When the level drops – so does the correction.)

Mic’ing Guitar Amps

First, identify the location of the speakers in the cabinet. Don’t assume that the speaker location is symmetrical (some are, some aren’t.) You may have to look inside the back of the cabinet if you can’t see through the front grillcloth.
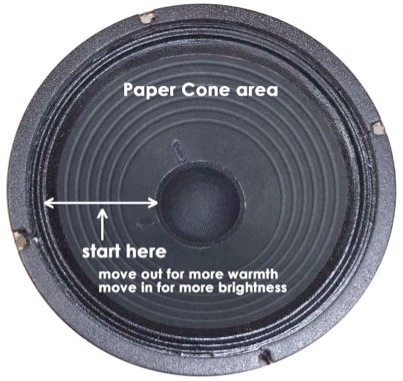
You may need to look at the back of the cabinet or shine a flashlight through the grillcloth to locate the position of the drivers inside the cabinet.

Next, aim for the center of the paper cone, and about 1-2” from the grillcloth. This is the general starting place for all setups. Adjustments will be made from this baseline, based on the sound desired and/or to fix problems.

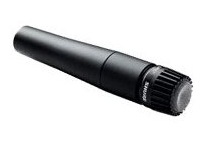
WHICH MIC? There are quite a few choices these days. The baseline microphone for guitar amps is the Shure SM57. It will almost always work.

Shure SM-57

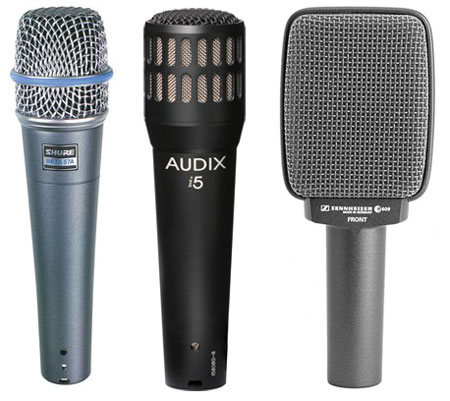
Working from the 57 as a baseline, there are some other choices such as the Beta 57, Audix i5, and the Sennheiser e609. The Audix i5 has a more pronounced proximity effect, which might give you more low end if close-mic’d. The Sennheiser e609 goes the other way, offering a less pronounced proximity effect if the amp is pretty bass-heavy already. Beyond that, you have the more exotic and expensive choices of large diaphragm condensers and ribbon mics.


New options: The Shure Beta 57, Audix i5, and Sennheiser e609.

TONE TIPS: There are two ways to get more low frequency response. (1) move the microphone closer to the grillcloth and take advantage of proximity effect, or (2) move the microphone more to the outside of the paper cone area. These tips also work in reverse for more brightness. You can also try angling the mic to see if the off-axis response might work to your favor. It’s always better to try moving the mic rather than reaching for EQ though. Moving the mic a couple inches might dramatically change the sound, and still leave you some EQ options.

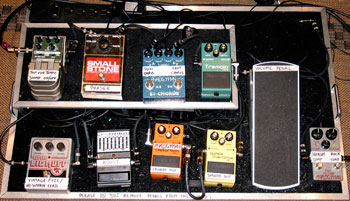
A pedalboard help's today's guitarists achieve a wide variety of sounds.

PHILOSOPHY: We always start from the assumption that the musician knows their gear, knows what sound they are trying to achieve, and has adjusted their pedals, tone knobs, and gain structure to produce the sound they want. So the primary goal here is to faithfully reproduce the sound that is coming out of the amplifier. Match tone first. Then improve if it needs it. Don’t just hang out in the booth during rehearsal. See what it sounds like coming out of the amp so you know what it should sound like coming out of the house.

WHAT IF THE TONE STILL STINKS? Sometimes, especially with newer players who do not know their gear very well, you have the situation where the sound coming out of the amp is just not good. If, regardless of mic choice, mic placement, and tone adjustments in the booth, the electric guitar sound is still unusable in your opinion, then it is time to talk to the stage. The first thing to do is to confer with the Music Director, Road Mgr, or Band Leader. DO NOT APPROACH THE MUSICIAN DIRECTLY UNLESS YOU HAVE A GOOD PERSONAL FRIENDSHIP WITH THEM. Calmly explain the problem. Let the Music Director, Band Leader, or Road Manager make the call.

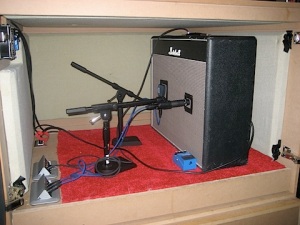
WHAT ABOUT VOLUME? If the stage volume is out of control, the first thing to determine with a player’s rig is if they are using the speaker cabinet as a monitor or as a tone-generator. For example, if they use a Line 6 Pod or other tone modeling device to achieve their sound, then the amp could just be used as a simple monitor, and lowering the volume will make everyone happy. However, if they are using the tubes in the amp to achieve the desired tone, then it may be a tough sell asking them to lower the volume. If that’s the situation, then you have to look at (1) changing the direction of the amp, (2) changing the location of the amp, (3) changing to a smaller amp, (4) utilizing one of the many “power attenuator” type devices on the market (such as the THD Hot Plate) to lower the cabinet volume, or (5) building an iso-box for the amp.


A look inside an iso box at Buckhead Church.

BONUS: How to build a isolation box to eliminate stage volume. (source: Buckhead Church’s production people.)

First Things First

(an excerpt from the SoundSessions training course)

WHAT IS IT THAT WE DO?
Being part of an audio team is a special privilege. We have the ability to affect everybody’s experience for the good or bad. We can really set up the people on the platform to win , or we can be an obstacle to their success. We have a high responsibility and the people on the platform are putting their trust in us that their artistic endeavors will arrive at the audience’s ears with a true representation – without us imposing our own preferences and biases.

We have two tasks that are equal in priority:
Provide a H O U S E  M I X that is representative of what’s happening on stage.
S E R V E the people on the platform so that they can do their best.

Pleasing other people can be important, but it cannot take precedence over the above goals. You have to know who it is you work for. Making the lead singer’s mother happy is not a consideration. Taking volume advice from the loud drunk at the festival or the cranky church Deacon is not recommended. But neither should we go to the other extreme and be rude to patrons. Just simply say “Thanks for your input, I’ll discuss it with the appropriate people.” B E   N I C E. There’s no need to escalate.

KNOW WHO IT IS YOU’RE WORKING FOR
In any performing arts situation, there is bound to be a lot of cooks in the kitchen. It is important to know who is in charge and what the chain of command is. It may be as simple as you working for the band. But it is also possible that there will be several levels of management over you, so make a point of trying to understand those subtleties and distinctions. If possible, try to get a grasp of that before you arrive. Here are some common scenarios:

BAR: Venue Owner > Sound Tech

CONCERT: Promoter > Band Leader > Sound Tech > Event Volunteers

MUSICAL: Theater Company > Auditorium Director > Tech Director > Sound Tech

CHURCH: Pastor > Create Arts Director > Music Director > Sound Tech

FESTIVAL: Festival Coordinator > Sound Company Rep > Sound Tech

Or, if you’re working directly for the band and in a festival type of situation, then your job would include some diplomacy and political skills so that you can provide what your band needs while also cooperating with others who may or may not have compatible agendas!

WHAT DOES IT REQUIRE?
Being a great audio engineer requires a few different skills, including:
– an understanding and P A S S I O N for the arts
– a K N O W L E D G E of the gear, how it works & interconnects
– a knowledge of the F R E Q U E N C Y spectrum and how it applies
– a basic understanding of E L E C T R I C A L needs and processes
– an organized mind that can track S I G N A L   F L O W and troubleshooting
– the ability to think like a M U S I C I A N and anticipate changes

DO YOU PLAY AN INSTRUMENT?
If not, it might be a good idea to take a few lessons. Having a foundational understanding of how music is performed and arranged could be a huge key to your success as a sound tech. Do you know what a verse, chorus, bridge, turnaround, build, half-time section, modulation, breakdown, second ending and coda are? If you want to work alongside musicians, then you better learn how to speak their language!

Components of a Pro Audio System

A SIMPLE, GENERIC SYSTEM LAYOUT

In this lesson, we will begin looking at the different components of a professional audio system. In articles to come, we will look in more detail at each component separately.

Source. This would include microphones, direct boxes, playback & other sources of audio.

Mixing Console. Where most of the action happens – the blending of inputs and outputs.

Processing. Various components which tweak and split the sound for various uses. Functions in a system processor would include Crossover, Gain, Polarity, Equalization, Delay, Merging & Splitting.

Amplifiers. Equipment that receives line-level inputs and delivers speaker-level outputs.

Loudspeakers. The various forms of transducers that convert electrical signal into acoustical energy. They are manufactured to optimally project a specific frequency range, i.e.: subwoofers, woofers, mids, and high-frequency horns.

SYSTEM FLOW TERMINOLOGY
It is important to get into the habit of speaking in terms of proper signal flow. Often, you will hear someone say “my amp is plugged into my guitar”. This is not correct. The guitar is the source. The sound travels O U T of the guitar, down the path of the cable, and I N to the guitar amp’s input. This same thinking applies to every input and output in an audio system. Force yourself so use the correct terminology, bearing in mind the direction of signal flow. You don’t plug anything INTO the output of a mixer! The mixer’s output plugs INTO the next piece of gear in the chain.

THE IMPORTANCE OF GAIN STRUCTURE
In a properly set up system, the console, processing, and amplifier inputs should all clip (reach the point of distortion, or overloaded signal) simultaneously. This gives you tha maximum headroom  (also called signal-to-noise ratio) out of the entire system chain.

THE AGE OF DIGITAL
Just a few years ago, the “processing” component of the signal chain was an entire rack or two of different pieces of gear. But in today’s reality of excellent quality digital audio processing, that same amount of processing (and more) fits in just 1 or 2 rack spaces. In addition, the proliferation of digital mixers and self-powered speakers means a lot of today’s signal chains look quite a bit different than those of just 15 years ago.

Tip Of The Day #40

Tip Of The Day #40: With EQ, remember the phrase – “Subtractive is Attractive.” Boosting adds noise, & decreases Gain Before Feedback.

My “Bass Player’s Compression Dilemma”

I am a bass player. I play a passive bass (one where the pickups do not require a battery inside the guitar). I love the tone of them – I love the low maintenance aspect of not having to wonder if I accidentally left the guitar plugged in and my battery might be drained.

But I’m not a rich man. I do not own a Lakland, or other high-end bass. My 5-string Yamaha cost me about $450 new several years ago. As such, the low B-string is a little “flabby” sounding – it doesn’t have a real strong fundamental tone down there. In order to correct that issue, I’ve been able to use compression. Compression is generally needed on all bass guitars because the volume tends to jump up and down a lot depending on the note, the fret position and the pickup selection. But with a rather inexpensive 5-string bass with a flabby B string, good compression is an absolutely CRITICAL part of my signal chain. [Here’s a quick video of my playing with the bass so you can hear what it sounds like with compression on the front end]

But now comes the dilemma – part 1: Do I totally depend on the sound guy of whatever venue I’m playing to instinctively know I have Flabby B Syndrome and assume he has the gear and knowledge to fix it? I’m not a fan of that option. How do I know he isn’t using too much or too little compression and completely desroying my dynamic control? No – I’d much rather have control of the compression on stage with me so I can set it correctly, monitor what it is doing, and can actually hear the results live.

Now for the dilemma – part 2: 99% of all stomp-box type compressors STINK for bass. They are noisy. They pump and breathe (an audible, non-pleasing compression side effect). How about the other 1% of them that are decent? They’re EXPENSIVE! Like $185 expensive. No thank you. If I’m going to pay that much for a compressor, then it had better be recording studio grade, baby. Come to think of it – that’s what I’m really looking for anyway – a studio-grade compressor for my bass rig.

So here comes dilemma – part 3: Studio-grade compressors are made for Line Level usage. As in +4 dBm (1.23 volts). These compressors want to see that hot of a signal coming into them. But wait! Instruments – especially passive ones – don’t put out even CLOSE to that amount of signal. Another issue is that of pickup loading. If the bass pickups do not sense the correct high-impedance load connected to them, then they will not output at their maximum capability and will lose some frequency response and level. So directly connecting my bass right into a studio-grade compressor is not really a viable option. There would also be the problem of monitoring. How would I connect my amp? The output of the compressor would be line level – and my amp’s input will be expecting instrument level! ARGH!

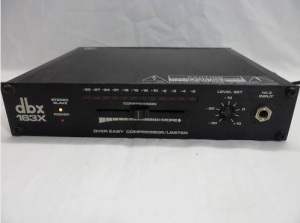
But here’s where I found the magic answer. An older dbx 163x compressor was EXACTLY what I was looking for. It has some unique features that fit my purpose wonderfully. First, it has two different inputs – a front and a rear. The rear input is line level and works like most high quality compressor inputs do. But the front input is High Impedance – SPECIFICALLY MADE for instrument level. The unit actually has a little preamp built into this input, so it even loads my pickups correctly! As for output, it has a very easy to adjust output level – so I can send out instrument level to an amp or direct box!

They don’t make these any more, but you can still find them on eBay and such. I was able to purchase two of them for $80! I now have exactly what I was looking for – studio grade compression with on stage control – and it wasn’t expensive!

Understanding Signal Flow

Knowing the audio path through a mixing console is absolutely critical to a sound engineer’s success. Using this information, the engineer can quickly TROUBLESHOOT the likely causes of common problems, and can even narrow down the possibilities of unexpected major problems. It can also prevent mistakes because you know what the audio is doing at each stage of the console.

It also gives the audio tech CONFIDENCE as he sits behind the console. This is because he fully knows the ins and outs (sorry for the pun) of the equipment. Finally, it gives the audio tech a FOUNDATION of understanding which allows them to move from room to room or console to console and not be thrown for a loop. Instead of thinking, “the 2nd red knob on my old console was always set to 12:00, does that mean the 2nd blue knob on this console should be set the same?” The knowledgeable tech will know exactly what that knob is and where it is in the audio signal chain (even consulting the owner’s manual if necessary.)

You want to be an excellent all-around driver of vehicles, not a specialist who only knows and drives a Chevy Malibu 2-door with the small V6.

GENERALITIES:
In general, the controls that you tend to “set” are at the top of the console, meaning you have to actually reach for them. The conrols that need more adjustments along the way are closer to your hands (i.e.: the channel faders.)

The channel strip tends to lay out generally “in order” as it applies to the audio signal flow – Gain, then EQ, then the Fader, for example. But this is a very broad overview. There is much more detail to be learned.

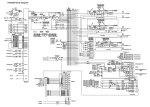
So how do you learn the signal flow of your paticular console? You break out the manual. It will contain what is typically called a “block diagram”. Now block diagrams can be headache-inducing nightmares. Check out this one for a Yamaha DM2000:

So I recommend that you take the time to create your own simplified signal flow. Just follow the lines on the block diagram to determine the signal path. It’s also recommended that you make it in linear, vertical orientation so that it helps you visualize the flow better. You can use any drawing or paint program to make one.

EXAMPLES:
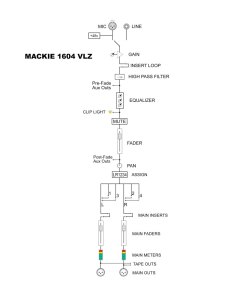
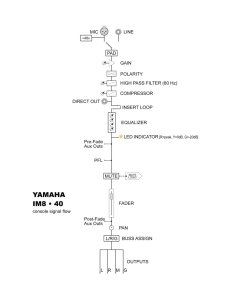
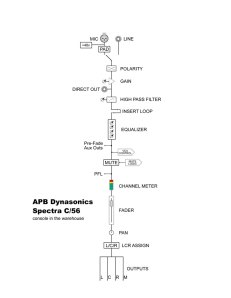
I have created a few Signal Flows for study. They can be extremely valuable learning tools. (Click on the images to see a full sized version). [Note: These images are for personal study only. Not to be used in any other websites or printed materials.]

Here is the signal flow of a Mackie 1604 VLZ.

And here is a larger format Yamaha IM8•40 console.

And here is an APB Dynasonics Spectra-C/56

BASIC DEFINITIONS:

Gain: A level adjustment designed to optimize each signal coming into the console.

Pad: If you turn the gain all the way to the left and the signal is still too hot, then you should engage the pad, which will reduce the incoming signal by a preset amount (usually 20 dB or so).

HPF: High-Pass Filter. A circuit which sharply decreases low frequencies, reducing mike handling noise, stage rumble, and plosives (p-pops).

Polarity: A simple switch which flips the polarity of the input. (Sometimes incorrectly labeled ‘phase’). Useful for eliminating phase-cancellation when using multiple mics on the same source (both the top and bottom of a snare drum, for example).

Insert Loop: A patch point for connecting outboard gear, such as a compressor or effects unit.

Direct Out: An individual channel output after the gain stage, but before EQ or fader involvement. Most often used for feeding multitrack recorders.

Aux mix: A separate mix of each channel which has its own output, which can be used to feed stage monitors, a recording mix, sends to a reverb unit, or other uses.

Pre/Post: An indication of where the Aux mix splits off from the main signal. If it is labeled as as “Pre” or “PreFade” mix, then its level is completely independent of the channel’s fader. If it is labeled as a “Post” or “PostFade” mix, then the aux’s level will also be affected by the channel fader as it is adjusted.

PFL: Pre Fade Listen. Works as a “solo” button for the engineer’s headphones. You can isolate an individual channel, and hear changes you make with the EQ. Because it is pre-fade, it does not matter where the fader is at the time.

Group/Subgroup: A Subgroup (or just “Group” on some consoles), is a tool used to help the audio tech during a service or performance. Rather than have to independently mix 32, 40, or even up to 56 channels on a console, you can assign for example, all the drums to one fader called a “subgroup”. The Subgroup does not affect any aux sends, it only affects the main mix. So I can raise or lower the level of all 8 drum mics on one fader – VERY USEFUL.

VCAs and VCA Groups: A VCA stands for Voltage Controlled Amplifier and is a common way to “automate” certain things on a mixing console. You can assign multiple channels to a VCA (just like a group), but the difference is – NO AUDIO IS PASSED THROUGH A VCA. Instead, the VCA acts exactly like a remote control to channels which are assigned to it. Where it gets really interesting is that channels that are assigned to a VCA Group DO NOT have to share a common audio path AT ALL. (This means you can have the entire band on one VCA fader, even if they all are routed to different mixes and subgroups!)

Something to keep in mind with VCAs that you don’t have to worry about with Groups: a VCA provides the exact same function as adjusting a channel’s fader (including any changes to it’s Post Aux mixes). This is different than a SubGroup, as a sub would only affect the house mix.

Buss: a common term seen in mixing console owner’s manuals. It is an electrical term rather than an audio term. Technically, an aux mix, a subgroup, a master mix, a mono output, a matrix output, etc. are all busses. The only way this term becomes important to an audio tech is in the possibility that you get some “buss distortion) which may not show up on the meters. If, for example, I assign all 32 channels of a console to SubGroup 1, and the console I’m driving doesn’t have Group Meters, and I keep the Group 1 fader low enough that I don’t get overloads on the Master Mix Meters, then it would be possible to overload the Group 1 buss, creating distortion, that would not show up on any meters. This is an extreme example to make a point – but I think you get it.

Matrix Mix: A completely different kind of output available only on the larger consoles. It’s sole purpose os to create an alternate mix to be used for recording, for routing a different mix to a different room, or for any other specialized purpose. You will not see a Matrix split on the following audio signal flows. Why? Because they are not made up of individual channels! A Matrix mix is created solely from mixing the Main Outputs and SubGroup Outputs. So a Matrix Out is created downstream from any individual channel functions.


SoundSessions

Audio Training for Live Sound. All content ©2010 Jeremy Carter Consulting.

Topic Tags